the table has been setup nicely.
But for the viewparams setup, how do I point this value to the value of this row at this column?
or do I need to write script to get the row index, then assign the value of this Value[row][column] to this param?
I have now configured to value, now I can see the different time values of each row.
Then I changed params of the value so I can read and write, but somehow I cannot change values from the table. If I change directly from the dataset, the new values can be updated to the table.
when changing the time by clicking the up/down arrow, 1 sec later, the value changed back.
do I need to setup any action trigger each time I change the value?
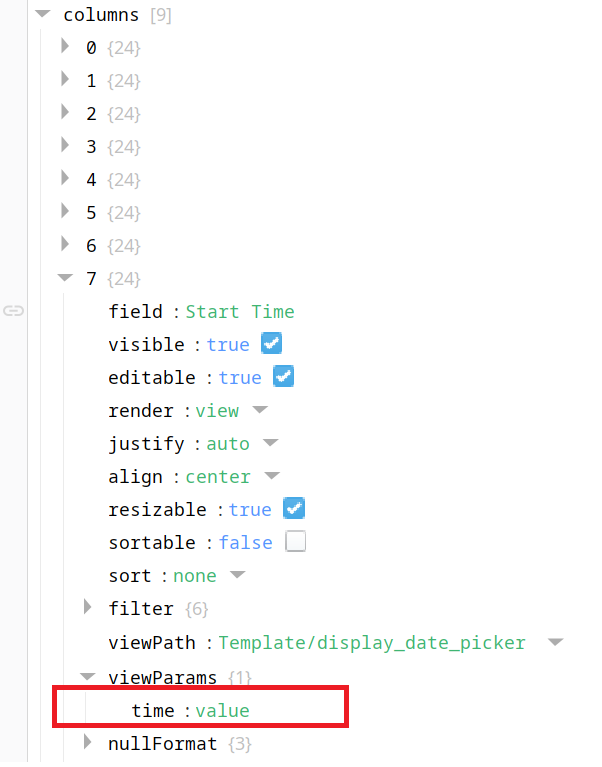
column, columnIndex, row, rowIndex and value, are the default params passed from the table to the component. As I have two time picker, one for start time, one for end time. so I create a new tag "tag_name" to record which time it is.
the time picker value is bound to the view.params.value.
def valueChanged(self, previousValue, currentValue, origin, missedEvents):
		value = currentValue.value
		if value is not None:
			if 'Binding' not in str(origin):
				msg = 'UpdateRow'
				rowIndex = self.view.params.rowIndex
				tag_name = self.view.params.tag_name
				payload =	{
							'value'	: value,
							'rowIndex': rowIndex,
							'tag_name': tag_name
							}
				system.perspective.sendMessage(msg, payload)
once configured, whenever the time picker value is changes, it will send a message.
4. this is the table configuration of the time picker. Processing: image.png…
5. this is the message handler script of the table.
The following script converts pyDataset to dataset.
I found it handy sometimes.
def pyds_to_ds(value):
	   headers = system.dataset.getColumnHeaders(value)
	   newData=[]
	   for rowIndex in range(value.rowCount):
	       	row = [value.getValueAt(rowIndex,col) for col in range(value.columnCount)]
	       	newData.append(row)
	   return system.dataset.toDataSet(headers,newData)
This solution works well for me when I use Dataset, but when I convert it to PyDataSet (to change cell background to highlight exceeded limits), then the date value is not sent into the embedded view. Does this automatic sending of a column parameter named "value" work for Dataset only but not for PyDataSet?
I also tried to create the parameter named "value" explicitly.
... when I convert it to PyDataSet (to change cell background to highlight exceeded limits) ...
I've only done that by building a JSON dictionary as used in the sample data loaded by default with the Perspective Table component. The manual offers alternatives. Styling Rows Based on Values | Ignition User Manual.
I have fixed the issue by adding a condition to skip the date column. It now stays scalar so the automatic passing of the "value" parameter into the embedded view works well. @Transistor , thank you for your comment. It has lead my research into the right direction.
Here's the resulting code of my Transform script:
def transform(self, value, quality, timestamp):

    HI_LIMIT = 5.0

    for row in value: 								# Iterate through each row in the data
        for column, cell_value in row.items():      # Iterate through each cell in the row
            if column != "SampleDate":				# Skip SampleDate column not to break the date picker in the embedded view

	            if cell_value > HI_LIMIT:
	                row[column] = {
	                    "value": cell_value,
	                    "style": {
	                        "backgroundColor": "#FFAAAA"
	                    }
	                }

    return value
Nobody has ever accused me of being an expert coder but I did pick up some useful tips on CodeAesthetic's Why You Shouldn't Nest Your Code. He's using C in the video but the same principles will apply to your Python code.
Your code is four levels deep by the time you get to row[column] = {. I've refactored it below, refactoring by "inversion" with early continue and now it's only two levels deep. I think it's a lot easier to follow.
Indeed, the code looks better without the excessive nesting. Thank you for your suggestion, @Transistor. Only I think we need to use continue instead of return to skip the current cycle and proceed with the next iteration. Also, these two conditions could be combined into one:
if (column = "SampleDate") or (cell_value <= HI_LIMIT):
    continue
In my resulting code it cannot be done, though, because the structure changed a bit:
def transform(self, value, quality, timestamp):
    # Fetch limits from the database using a named query
    limits_query = system.db.runNamedQuery("Select_all_limits")

    # Extract low and high limits from the query result
    low_limits  = limits_query[0]
    high_limits = limits_query[1]

    for row in value:  # Iterate through each row in the data
        for column, cell_value in row.items():  # Iterate through each cell in the row
            if (column in ("SampleDate", "id")) or cell_value == None:  # Skip SampleDate column not to break the date picker in the embedded view
            	continue
            try:
                numeric_value = float(cell_value)  # Convert cell value to a float

                # Get the low and high limits for the current column
                low_limit  = float( low_limits[column])
                high_limit = float(high_limits[column])

                # Check if the value is outside the limits and set the background color accordingly
                if (numeric_value >= low_limit) and (numeric_value <= high_limit):
                	continue
                row[column] = {
                    "value": cell_value,
                    "style": {
                        "backgroundColor": "#FFAAAA"  # Red background for out-of-limit values
                    }
                }
            except ValueError:
                pass  # if conversion to float fails

    return value