Holiday Paintable Canvas Challenge

Create your best holiday image in the paintable canvas and share it here.

Example:
I was able to create a Santa Clause in the paintable canvas by simply tracing an image using the techniques outlined in this tutorial:
Paintable Canvas Hacks Post #1

Result:
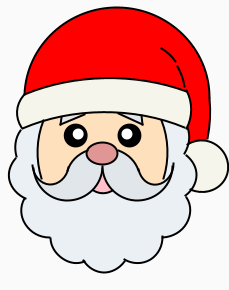
Repaint Event Code:

from java.awt import BasicStroke
from java.awt.geom import Arc2D, GeneralPath

graphics = event.graphics
graphics.stroke = BasicStroke(2)
graphics.color = system.gui.color('red')

# Scale graphics to actual component size
dX = (event.width-1)/230.0
dY = (event.height-1)/275.0
graphics.scale(dX,dY)

###################
# Paint Red HAT
###################
hat = GeneralPath()

# Top of hat
hat.append(Arc2D.Double(20, 5, 185, 180, 360, 178, Arc2D.OPEN), True)

# Top of hat brim
hat.append(Arc2D.Double(-60, 75, 330, 230, 121, -59, Arc2D.OPEN), True)

# Right of hat brim
hat.append(Arc2D.Double(117, 69, 70, 76, 30, -60, Arc2D.OPEN), True)

# Beard Border
hat.append(Arc2D.Double(121, 105, 64, 62, 30, -40, Arc2D.OPEN), True)

# Top of ball on hat
hat.append(Arc2D.Double(171, 138, 53, 52, 114, -34, Arc2D.OPEN), True)

# Hat tail 
hat.append(Arc2D.Double(-39, -20, 245, 257, 348, 18, Arc2D.OPEN), True)

hat.closePath()
graphics.fill(hat)

###################
# Paint White Hat Brim
###################
graphics.color = system.gui.color(245, 245, 235)
hatBrim = GeneralPath()

# Top of hat brim
hatBrim.append(Arc2D.Double(-60, 75, 330, 230, 62, 59, Arc2D.OPEN), True)

# Left of hat brim
hatBrim.append(Arc2D.Double(12, 80, 70, 61, 144, 65, Arc2D.OPEN), True)

# Bottom of hat brim
hatBrim.append(Arc2D.Double(-60, 110, 320, 230, 121, -61, Arc2D.OPEN), True)

# Right of hat brim
hatBrim.append(Arc2D.Double(117, 69, 70, 76, 330, 60, Arc2D.OPEN), True)

hatBrim.closePath()
graphics.fill(hatBrim)

###################
# Paint White Hat Ball
###################

graphics.color = system.gui.color(245, 245, 235)
graphics.fillOval(171, 138, 53, 52)

###################
# Paint White Beard
###################
beard = GeneralPath()
graphics.color = system.gui.color(235, 240, 245)

# Beard Shapes starting at the left and moving clockwise
beard.append(Arc2D.Double(10, 115, 64, 62, 145, 50, Arc2D.OPEN), True)
beard.append(Arc2D.Double(4, 146, 58, 53, 142, 102, Arc2D.OPEN), True)
beard.append(Arc2D.Double(16, 182, 58, 53, 152, 118, Arc2D.OPEN), True)
beard.append(Arc2D.Double(46, 208, 50, 53, 183, 108, Arc2D.OPEN), True)
beard.append(Arc2D.Double(75, 216, 50, 54, 214, 108, Arc2D.OPEN), True) # Bottom of beard
beard.append(Arc2D.Double(108, 208, 50, 53, 240, 121, Arc2D.OPEN), True)
beard.append(Arc2D.Double(128, 182, 58, 53, 273, 118, Arc2D.OPEN), True)
beard.append(Arc2D.Double(134, 146, 58, 53, 309, 99, Arc2D.OPEN), True)
beard.append(Arc2D.Double(121, 105, 64, 62, 330, 50, Arc2D.OPEN), True)

# Bottom of hat brim
beard.append(Arc2D.Double(-60, 110, 320, 230, 60, 61, Arc2D.OPEN), True)

beard.closePath()
graphics.fill(beard)

###################
# Paint Face
###################
face = GeneralPath()
graphics.color = system.gui.color(255, 224, 189)

# Right cheek
face.append(Arc2D.Double(33, 75, 130, 150, 330, 55, Arc2D.OPEN), True)

# Bottom of hat brim
face.append(Arc2D.Double(-60, 110, 320, 230, 65, 50, Arc2D.OPEN), True)

# left cheek
face.append(Arc2D.Double(33, 75, 130, 150, 155, 55, Arc2D.OPEN), True)


face.closePath()
graphics.fill(face)

###################
# Paint Mouth
###################

graphics.color = system.gui.color('pink')
graphics.fillOval(79, 150, 38, 41)

###################
# Paint Eyebrows
###################
graphics.color = system.gui.color(225, 230, 235)

rightEyeBrow = GeneralPath()
rightEyeBrow.moveTo(137, 113)
rightEyeBrow.lineTo(138, 122)
rightEyeBrow.lineTo(114, 111)
rightEyeBrow.closePath()
graphics.fill(rightEyeBrow)

leftEyeBrow = GeneralPath()
leftEyeBrow.moveTo(57, 115)
leftEyeBrow.lineTo(56, 122)
leftEyeBrow.lineTo(80, 112)
leftEyeBrow.closePath()
graphics.fill(leftEyeBrow)

###################
# Paint Mustash
###################
LeftStash = GeneralPath()
LeftStash.append(Arc2D.Double(61, 145, 75, 64, 114, 50, Arc2D.OPEN), True)
LeftStash.append(Arc2D.Double(28, 141, 36, 41, 349, -164, Arc2D.OPEN), True)
LeftStash.append(Arc2D.Double(28, 128, 70, 70, 185, 174, Arc2D.OPEN), True)
LeftStash.closePath()
graphics.fill(LeftStash)

RightStash = GeneralPath()
RightStash.append(Arc2D.Double(98, 128, 70, 70, 185, 174, Arc2D.OPEN), True)
RightStash.append(Arc2D.Double(133, 141, 36, 41, 1, -166, Arc2D.OPEN), True)
RightStash.append(Arc2D.Double(61, 145, 75, 64, 16, 50, Arc2D.OPEN), True)
RightStash.closePath()
graphics.fill(RightStash)

###################
# Paint Nose
###################

graphics.color = system.gui.color(225, 150, 150)
graphics.fillOval(82, 140, 31, 22)

###################
# Draw Santa outline and facial details over filled shapes
###################
graphics.stroke = BasicStroke(2)
graphics.color = system.gui.color('black')

# Top of hat
graphics.drawArc(20, 5, 185, 180, 360, 178)

# Top of hat brim
graphics.drawArc(-60, 75, 330, 230, 62, 59)

# Bottom of hat brim
graphics.drawArc(-60, 110, 320, 230, 60, 61)

# Left of hat brim
graphics.drawArc(12, 80, 70, 61, 144, 65)

# Right of hat brim
graphics.drawArc(117, 69, 70, 76, 330, 60)

# Crease between hat tail and hat
graphics.drawArc(95, 40, 86, 106, 10, 24)
graphics.drawArc(95, 40, 86, 106, 40, 24)

# Hat tail
graphics.drawArc(-39, -19, 245, 257, 348, 18)

# Ball on end of hat tail
graphics.drawArc(171, 138, 53, 52, 245, 238)

# Beard counterclockwise
graphics.drawArc(121, 105, 64, 62, 330, 50)
graphics.drawArc(134, 146, 58, 53, 309, 99)
graphics.drawArc(128, 182, 58, 53, 273, 118)
graphics.drawArc(108, 208, 50, 53, 240, 121)
graphics.drawArc(75, 216, 50, 54, 214, 108) # Bottom of beard
graphics.drawArc(46, 208, 50, 53, 183, 108)
graphics.drawArc(16, 182, 58, 53, 152, 118)
graphics.drawArc(4, 146, 58, 53, 142, 102)
graphics.drawArc(10, 115, 64, 62, 145, 50)

# Left Cheek
graphics.drawArc(33, 75, 130, 150, 155, 45)

# Right Cheek
graphics.drawArc(33, 75, 130, 150, 340, 45)

# Nose
graphics.drawOval(82, 140, 31, 22)

# left and right  eyes
graphics.fillOval(59, 121, 24, 24)
graphics.fillOval(113, 121, 24, 24)

# left and right pupils
graphics.color = system.gui.color('white')
graphics.fillOval(68, 126, 11, 11)
graphics.fillOval(117, 126, 11, 11)

# Left Eyebrow
graphics.color = system.gui.color('black')
graphics.drawLine(57, 115, 56, 122)
graphics.drawLine(56, 122, 80, 112)

# Right Eyebrow
graphics.color = system.gui.color('black')
graphics.drawLine(137, 113, 138, 122)
graphics.drawLine(138, 122, 114, 111)

# Right stash
graphics.drawArc(61, 145, 75, 64, 16, 50)
graphics.drawArc(133, 141, 36, 41, 195, 166)
graphics.drawArc(98, 128, 70, 70, 185, 174)

# Left Stash
graphics.drawArc(61, 145, 75, 64, 114, 50)
graphics.drawArc(28, 141, 36, 41, 185, 164)
graphics.drawArc(28, 128, 70, 70, 185, 174)

# Mouth
graphics.drawArc(79, 150, 38, 41, 240, 60)

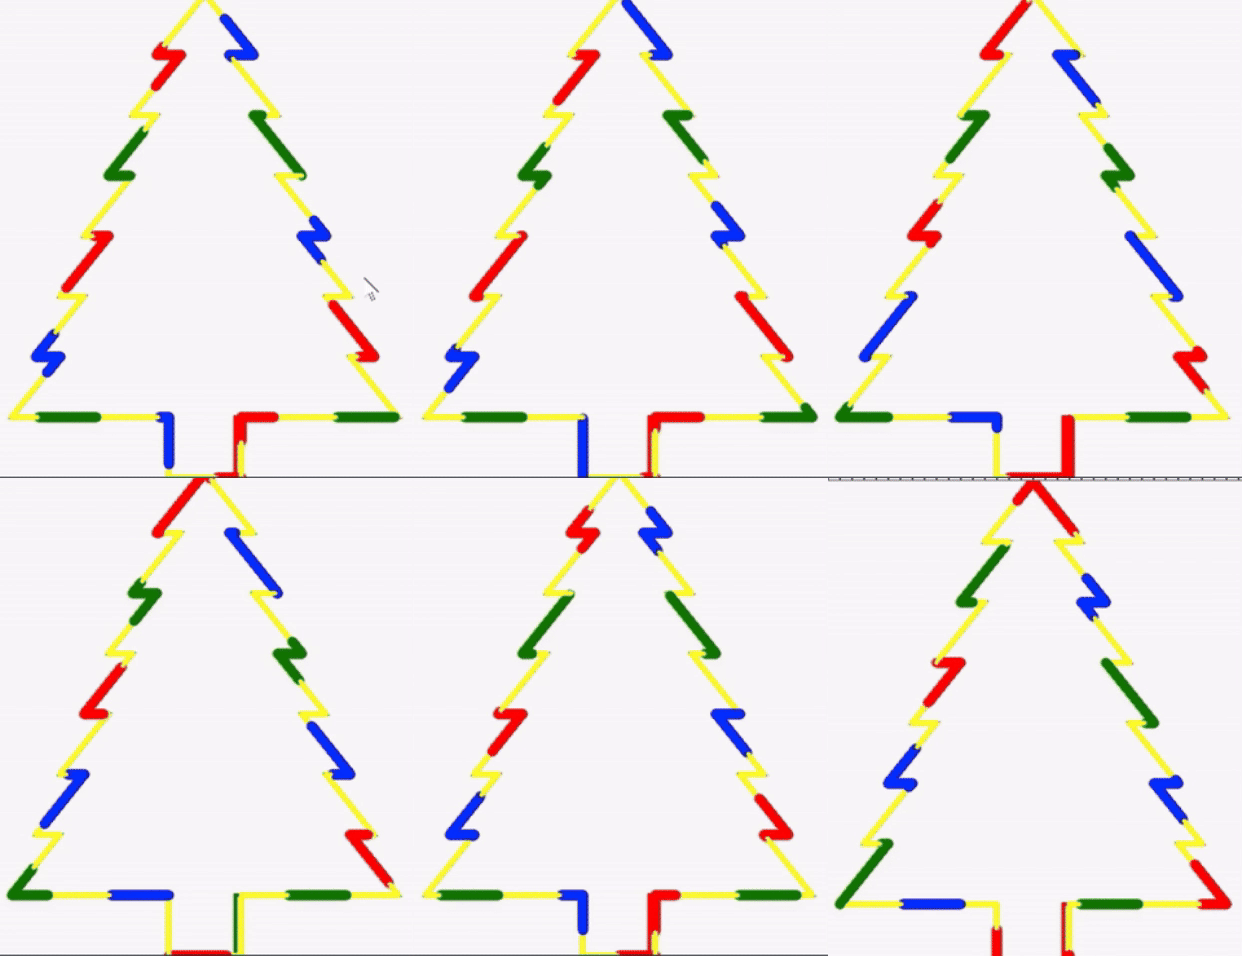
I bet it'd be fun to have a procedurally generated tree with randomly placed lights, tinsel, ornaments?

No nerd sniping, Justin! There's end of year deadlines to think of!

I've made Christmas trees before: :slight_smile: Traced Christmas Tree Example

Traced Christmas Tree

For more fun:
Add a running timer component to the window. Then, put a custom property on the canvas called value and bind it to the value property of the timer to drive animations in the canvas.

Example: (Using the Santa repaint event code above)
Modify the part of the code where the eyes and pupils are drawn, so they change with the timer value:

# left and right  eyes
graphics.fillOval(59, 121, 24, 24)
if event.source.value % 2:
	graphics.fillOval(113, 121, 24, 24)
else:
	graphics.drawLine(113, 132, 133, 132)

# left and right pupils
graphics.color = system.gui.color('white')
graphics.fillOval(68, 126, 11, 11)
if event.source.value % 2:
	graphics.fillOval(117, 126, 11, 11)

Result:
SantaWinking

Thanksgiving Turkey

Repaint Event Script

from java.awt import BasicStroke

graphics = event.graphics
graphics.stroke = BasicStroke(1)

dX = (event.width-1)/225.0
dY = (event.height-1)/225.0
graphics.scale(dX,dY)

bodyColor = system.gui.color(139, 69, 19)		# brown
chestColor = system.gui.color(120, 60, 20)		# darker brown
legColor = system.gui.color(255, 140, 0)		# orange
beakColor = system.gui.color(255, 165, 0)		# lighter orange
black = system.gui.color('black')
white = system.gui.color('white')

tailColors = [
	system.gui.color(160, 82, 45),				# sienna
	system.gui.color(205, 92, 92),				# indian red
	system.gui.color(222, 184, 135),			# tan
	system.gui.color(210, 105, 30),				# chocolate
	system.gui.color(184, 134, 11),				# dark gold
	bodyColor									# brown
	]

# Draw tail feathers behind the body
baseX = 38
baseY = 80
diameter = 130
arcSpan = 25
overlap = 5
totalArc = (arcSpan - overlap) * len(tailColors) 
for iteration in xrange(1, 3):
	startAngle = 208 + (totalArc * iteration)
	for index, color in enumerate(tailColors):
		graphics.color = color
		graphics.fillArc(baseX, baseY, diameter, diameter, startAngle + (index * (arcSpan - overlap)), arcSpan)


##################### 
# Neck & Head
#####################
# Neck
graphics.color = bodyColor
graphics.fillRoundRect(95, 80, 20, 30, 10, 10)
graphics.color = black
graphics.drawRoundRect(95, 80, 20, 30, 10, 10)

# Head
graphics.color = bodyColor
graphics.fillOval(90, 55, 30, 30)
graphics.color = black
graphics.drawArc(90, 55, 30, 30, 0, 231)

##################### 
# Face
##################### 

# Eye
graphics.color = white
graphics.fillOval(100, 63, 10, 10)

# Pupil
graphics.color = black
graphics.fillOval(104, 67, 4, 4)

# Beak
graphics.color = beakColor
beakX = [118, 135, 118]
beakY = [70, 78, 86]
graphics.fillPolygon(beakX, beakY, 3)
graphics.color = black
graphics.drawPolygon(beakX, beakY, 3)

# Wattle
graphics.color = system.gui.color(200, 0, 0)
graphics.fillOval(112, 75, 8, 15)

# Body
graphics.color = black
graphics.drawArc(75, 90, 60, 70, 110, 320)
graphics.color = bodyColor
graphics.fillOval(75, 90, 60, 70)

# Chest
graphics.color = chestColor
graphics.fillOval(75, 105, 60, 45)

# Feet & Legs
graphics.stroke = BasicStroke(3)
graphics.color = legColor

# Legs
graphics.drawLine(95, 155, 95, 185)
graphics.drawLine(115, 155, 115, 185)

# Left Foot
graphics.drawLine(95, 185, 85, 190)
graphics.drawLine(95, 185, 105, 190)
graphics.drawLine(95, 180, 95, 190)

# Right Foot
graphics.drawLine(115, 185, 105, 190)
graphics.drawLine(115, 185, 125, 190)
graphics.drawLine(115, 180, 115, 190)

You forgot the potatoes and the gravy.

edit: I hope you made functions for these drawings. I'm imagining calls to cook_turkey(), bake_potatoes()...

I make a really good Easter egg, but somebody will have to find it before I'll be willing to give up the recipe:
Easter Egg Challenge

I earnestly spent a while once trying to cheat and find the easter egg just looking at the code and couldn't, so hats off (or I'm particularly blind).

The power of obfuscation :upside_down_face: I knew somebody would take that approach, so I went out of my way to use ambiguous and misleading variable names to conceal it.

Hint: The vast majority of my functions are meticulously commented.

Old Glory

Perfect for Memorial Day, Independence Day, and other patriotic American holidays

Add this code to the paintable canvas's repaint event handler:
Note: The canvas will need to be a size of at least 345 x 182 to see the entire flag

graphics = event.graphics

## The original width and height of this paintable canvas in the designer
#unscaledWidth = ???
#unscaledHeight = ???

## (Optional) Allow the canvas to be resized and scale the flag automatically
#dX = (event.width - 1) / unscaledWidth
#dY = (event.height - 1) / unscaledHeight
#graphics.scale(dX,dY)

# Iterate through the 13 stripes that represent the 13 colonies and paint them
for stripe in xrange(13):
	if stripe % 2: # Alternate red and white
		graphics.color = system.gui.color('white')
	else:
		graphics.color = system.gui.color(179, 25, 66)	# Old glory red
	
	# Proper flag dimensions were calculated using this website (pixels were substituted for inches):
	# https://www.inchcalculator.com/american-flag-size-proportions-calculator/
	stripeHeight = 14
	flagWidth = 345
	graphics.fillRect(0, (stripeHeight * stripe), flagWidth, stripeHeight)

# Create a blue rectangle for the 50 stars
graphics.color = system.gui.color(10, 49, 97)	# Old glory blue
graphics.fillRect(0, 0, 138, 97)

# Define all the points needed to make a single star in the top left corner of the canvas
# When making eyeball adjustments to the star size and shape,
# ...the coordinates are much easier to visualize written like this
# ..instead of already split into the X and Y lists that the fillPolygon method requires
points = [
	(4, 0),	# Top outer point
	(5, 3),	# Upper right inner point
	(8, 3),	# Upper right outer point
	(5, 5),	# Lower right inner point
	(7, 8),	# Bottom right outer point
	(4, 7),	# Bottom inner point
	(1, 8),	# Bottom left outer point
	(2, 5),	# Lower left inner point
	(0, 3),	# Upper left outer point
	(3, 3)]	# Upper left inner point

# Separate the x and y coordinates for the top left star into seperate lists for the fillPolygon method,
# ...and inset the star by an arbitrary margin (This was originally done directly in the points set,
# ...but once the star shape was perfected, these variables were added to make tinkering with the insets easier to do
topMargin = leftMargin = 4
xCoordinates = [coordinateSet[0] + leftMargin for coordinateSet in points]
yCoordinates = [coordinateSet[1] + topMargin for coordinateSet in points]

# Switch to white for the stars
graphics.color = system.gui.color('white')

# These arbitrary spacing parameters were precisely calculated using trial and error
horizontalSpacing = 24	# The space betwenn the left edge of a star and the left edge of its neighboring star to the right
verticalSpacing = 10	# The space between the top edge of a row, and the top edge of the row below it

# The american flag currently has 5 rows of 6 stars and 4 rows of 5 stars for a total 9 rows
for row in xrange(9):
	starCount = 5 if row % 2 else 6		# Alternate between rows of 6 and 5 stars
	starInset = 12 if row % 2 else 0	# Inset the rows of 5, so the stars appear evenly staggared
	
	# Iterate through each star in the given row,
	# ...and calculate a list of X and Y coordinates for each star to pass into the fillPolygon method
	for star in xrange(starCount):
		starSpecificXCoords = [xCoordinate + starInset + (star * horizontalSpacing) for xCoordinate in xCoordinates]
		starSpecificYCoords = [yCoordinate + (row * verticalSpacing) for yCoordinate in yCoordinates]
		
		# https://docs.oracle.com/javase/8/docs/api/java/awt/Graphics.html#fillPolygon-int:A-int:A-int-
		#graphics.fillPolygon(int[] xPoints, int[] yPoints, int numberOfPoints)
		graphics.fillPolygon(starSpecificXCoords, starSpecificYCoords, len(xCoordinates))
		
# Paint a small border around the flag, so it will look complete against white backgrounds.
graphics.color = system.gui.color('black')
graphics.drawRect(0, 0, flagWidth, (13 * stripeHeight))

Does anybody have a function for generating fireworks in the paintable canvas? I've been messing around with it a bit ahead of the 4th, and here's what I've got so far. Unfortunately, I'm not quite satisfied with it, and it doesn't look like I'm gonna have time to get it right before the holiday.

Patriatism

The main thing that looks off to me is the trails drifting down as much as they do. Looking at fireworks shows, there's a little downwards drift but it's pretty minor compared to say sideways drift due to wind. You can probably reduce the gravity on the trails by a good bit.

A minor thing is the trails aren't following a ballistic trajectory, especially on the one that looks like a 5 petaled flower (the other ones aren't as noticeable). It's probably not super important to the overall impression though.

I just think it needs more colors (maybe a slightly darker background as well?)

Some reddish & bluish explosions.

I found this JS fireworks library with a really nice demo. It only does one kind of firework but you can play with all kinds of parameters that could give you ideas.

There's a nice feature in particular where the individual particles shimmer a little as they fade. It also draws the rocket traces coming up to where the fireworks appear, might also be a nice touch.

EDIT: I also found this Java2D fireworks library, which has 4 or 5 kinds of fireworks using particles, but doesn't do any gravity. You've already got good variety, but in case you want to look for more inspiration.

Happy Independence Day!

IndependanceDay

Easy enough

Thanks, I modeled what I had onto that example, and this was the result.

Here is my animations.fireworksShow library script in case anybody wants to use it or develop it further:

from java.awt.geom import GeneralPath
from java.awt import BasicStroke
from java.lang.Math import sin, cos, PI
color = system.gui.color


fireworksShow = [ # startFrame, burstX, burstY, hueColor(r, g, b), sparkCount, radius
	(0, 120, 145, (255,210,90), 70, 105),
	(18, 285, 130, (80,170,255), 65, 90),
	(35, 430, 250, (255,90,90), 80, 120),
	(52, 500, 140, (110,255,120), 70, 105),
	(68, 645, 95, (255,245,210), 95, 150),
	(82, 715, 205, (255,210,90), 85, 130),
	(100, 815, 165, (80,160,255), 75, 110),
	(116, 960, 275, (255,120,90), 80, 125),
	(132, 1040, 145, (255,210,90), 72, 110),
	(148, 1160, 230, (110,255,120), 68, 100)]

def drawFireworksShow(graphics, frame, startFrame, launchX, launchY, burstX, burstY, hueColor, sparkCount, radius):
	
	# Some dynamic pproperties such as rgba values (o - 255) have to be contained no matter what within a specific range to be valid
	# ...so this helper function is used as a clean way to contain such things
	def getClampedValue(value, low, high):
		return max(low, min(high, value))
	
	# -X^2 + 2X + 1
	# Use a quadradic equation to create a parabala
	# Not just for the geomotry, but also for the changes speed and fade
	# Fireworks start fast and bright when they burst, but then they slow and become gradually dimmer
	def getArcFactor(value):
		value = getClampedValue(value, 0.0, 1.0)
		return 1 - (1 - value) * (1 - value)
	
	# Creates a factor that can be used to create seemingly random patterns that will always repeat
	def getVariationFactor(sparkIndex, startFrame, rangeSize):
		
		# Create a seemingly random, but repeatable, index value
		firstMultiplier = 37
		secondMultiplier = 91
		pseudoRandomIndex = sparkIndex * firstMultiplier + startFrame * secondMultiplier
		
		# Wrap the value into the desired range.
		wrappedIndex = pseudoRandomIndex % rangeSize		
		
		# Normalize to a factor between 0.0 and 1.0.
		return wrappedIndex / float(rangeSize)
	
	# ============================
	# These hard coded parameters could be abstracted in some way to create more variation in the display
	launchDuration = 32			# How many frames from launch to explosion
	explosionDuration = 95		# How many frames does the explosion last
	initialFlashDuration = 4	# How long does the initial explosion birst last before it fades away
	maximumDrop = 45			# Simulates gravity --> using a parabolic drop factor,
								# ...the position of each spark will be offset in pixels by this total over the life cycle
	frictionFactor = 0.985		# Simulates air resistance by slowing the spark down a bit each frame
	repeatInterval = 180		# How often in frames each firework repeats
	rocketDiameter = 6			# The width of the rocket
	trailingDotDiameter = 4		# The width of the rocket tail
	initialBurstDiameter = 24	# The size of the initial explosion before the streamers become visible
	
	# Burst colors
	whiteHot = (90, 170, 255)
	gold = (110, 255, 120)
	orangeRed = (255, 80, 65)
	blueGreen = (255, 245, 210)
	# ===========================
	
	# Notes and observations on "age"
	# The modulus will keep the cycle between 0 and the repeat interval
	# The timer counts up forever, so it is unlikely that the frame minus the startFrame will ever be negative, 
	# ...but if this happens, the age will end up being the repeat interval minus the frame
	#  The repeat interval should be significantly larger than the combined launch and explosion durations,
	# ...so the fireworks don't suddenly disappear and start over or repeat so quickly that it becomes noticable
	age = (frame - startFrame) % repeatInterval
	
	# Abort the operation if the modulus puts the firework outside the launch and explosion windows
	if age > (launchDuration + explosionDuration):
		return
	
	# Rocket launch / trace
	if age < launchDuration:
		
		# Get the launch percentage and offset it parabolically,
		# ...so it moves fast at first, but eventually slows down and runs out of steam toward the end of it's launch
		launchPercentage = age / float(launchDuration)
		launchArcFactor = getArcFactor(launchPercentage)
		
		# Calculate the current frame location for the rocket using the parabolically offset percentage
		x = launchX + (burstX - launchX) * launchArcFactor
		y = launchY + (burstY - launchY) * launchArcFactor
		
		# Calculate the circle radii for coordinate offsetting
		# ... to center the rocket and trailing dots on the calculated coordinates
		rocketRadius = rocketDiameter / 2
		dotRadius = trailingDotDiameter / 2
		
		# Paint the bright rocket head
		graphics.color = color(255, 245, 210, 230)
		graphics.fillOval(int(x - rocketRadius), int(y - rocketRadius), rocketDiameter, rocketDiameter)

		# Paint the fading launch trail
		trailingDotCount = 8
		for trailingDot in xrange(trailingDotCount):
			
			# Reduce the percentage of each dot by an equally spaced amount
			# ...based upon the percentage if the launch distance travelled
			regressionFactor = 0.035
			dotOffset = max(0.0, launchPercentage - trailingDot * regressionFactor)
			
			# Calculate the x and y coordinates using the offset percentage
			# ...and coupled with the parabolic offset that causes the projectile to slow at the end of its arc,
			# ...which also causes the dots to come closer together making the slowing down more appearant
			dotX = launchX + (burstX - launchX) * getArcFactor(dotOffset)
			dotY = launchY + (burstY - launchY) * getArcFactor(dotOffset)
			
			# Make each progressive dat more transparent, so it looks like the trail of projectile is getting cooler the further away
			alpha = int(160 * (1.0 - trailingDot / float(trailingDotCount)))
			graphics.color = system.gui.color(255, 170, 80, alpha)
			
			# This could be made to taper a bit,
			# ...but the decreased transparency somehow makes the dots look progressively smaller even though they aren't
			# ...so the added complexity seems unnecessary
			graphics.fillOval(int(dotX - dotRadius), int(dotY - dotRadius), trailingDotDiameter, trailingDotDiameter)
		
		# No need to continue past this point during the launch phase
		return

	# Explosion
	explosionAge = age - launchDuration
	explosionPercentage = explosionAge / float(explosionDuration)
	maxAlpha = 240
	alphaBase = int(maxAlpha * (1.0 - explosionPercentage))
	expansion = getArcFactor(explosionPercentage)
	
	# Paint the initial burst flash
	if explosionAge < initialFlashDuration:
		
		# As each progressive frame of the initial burst passes, ...slowly fade it away
		flashPercentage = explosionAge / float(initialFlashDuration)
		initialAlphaPercentage = 1.0 - flashPercentage
		initialTransparancy = 180
		flashAlpha = int(initialTransparancy * initialAlphaPercentage)
		graphics.color = color(255, 255, 235, flashAlpha)
		initialBurstRadius = initialBurstDiameter / 2
		graphics.fillOval(int(burstX - initialBurstRadius), int(burstY - initialBurstRadius), initialBurstDiameter, initialBurstDiameter)
	
	# Individually draw each spark of the given spark count
	for spark in xrange(sparkCount):
		
		# Evenly space each spark around a 360 degree (2PI radian) circle
		angle = (PI * 2) * (spark / float(sparkCount))

		# Shake things up a bit with some pseudo randomness
		# The range variables were tested with a couple of numeric text fields
		# ...passing the integer values into this function as arguments
		# The life range has the most immediate effect, pushing the sparks into haphazard spirals with just a one or two value change
		# ...36 to 40 looked the best to me. I liked 38 because it gives the explosion an almost unpredictable eliptical squish
		speedRange = 44
		lifeRange = 38
		minimumSpeedFactor = 0.65
		minimumLifeFactor = 0.70
		speedFactor = getVariationFactor(spark, startFrame, speedRange) + minimumSpeedFactor
		lifeFactor = getVariationFactor(spark, startFrame, lifeRange) + minimumLifeFactor
		
		# This factor makes it where the sparks will not all age at the same speed
		sparkAgeFactor = getClampedValue(explosionPercentage / lifeFactor, 0.0, 1.0)
		
		# Simulated acceleration + friction feel
		distance = radius * speedFactor * getArcFactor(sparkAgeFactor)
		distance = distance * (frictionFactor + (1.0 - frictionFactor) * (1.0 - sparkAgeFactor))
		
		# Gravity offset ~ ...and since the sparkAgeFactor is squared, the effect is parabolic
		# ...meaning the drop starts small and moves faster with time
		drop = maximumDrop * sparkAgeFactor * sparkAgeFactor
		
		# Alternate curl directions, so neighboring sparks to not curve the same way
		curlDirection = -1 if spark % 2 == 0 else 1
		
		# Using pseudo variation, calculate the amount of curl for the current spark at this given frame
		minimumCurl = 8
		maximumAdditionalCurl = 18
		curlVariation = getVariationFactor(spark, startFrame, maximumAdditionalCurl)
		curlAmount = (minimumCurl + curlVariation * maximumAdditionalCurl) * sparkAgeFactor
		curlOffsetX = -sin(angle) * curlDirection * curlAmount
		curlOffsetY =  cos(angle) * curlDirection * curlAmount
		
		# Calculate the spark position along its trajectory using the curlOffset
		sparkX = burstX + cos(angle) * distance + curlOffsetX
		sparkY = burstY + sin(angle) * distance + drop + curlOffsetY
		
		# Calculate the streaming tail coordinates of the spark
		initialTailFactor = 0.70
		tailStretch = 0.18
		tailGravityFactor = 0.55
		tailDistance = distance * (initialTailFactor - tailStretch * sparkAgeFactor)
		tailX = burstX + cos(angle) * tailDistance
		tailY = burstY + sin(angle) * tailDistance + drop * tailGravityFactor # The tail is smokey and should drop slower than the spark itself

		# Dramatically offset the transparancy intermittently to create a sparkling effect
		if spark % 5 == frame % 5:
			flickerFactor = 0.45
		else:
			flickerFactor = 1.0
		alpha = int(alphaBase * (1.0 - sparkAgeFactor) * flickerFactor)
		
		# If alpha hits 0, we wouldn't see the spark even if we wanted to, so it's simply time to move on to the next spark
		if alpha <= 0:
			continue
		
		# Transparency is variable, so unpack the color variations,
		# ...and combine them with the dynamic alpha to create the final color for this iteration , gold, red, blue/green accents
		if spark % 13 == 0:
			r, g, b = whiteHot
		elif spark % 11 == 0:
			r, g, b = gold
		elif spark % 7 == 0:
			r, g, b = orangeRed
		elif spark % 3 == 0:
			r, g, b = blueGreen
		else:
			r, g, b = hueColor
		graphics.color = system.gui.color(r, g, b, getClampedValue(alpha, 0, 255))
		
		# Gradually shrink the width of the spark and trail as the explosion ages
		minimumSparkWidth = 1.0
		maximumSparkWidth = 3.0
		width = max(minimumSparkWidth, maximumSparkWidth - sparkAgeFactor * 2.0)
		graphics.stroke = BasicStroke(width, BasicStroke.CAP_ROUND, BasicStroke.JOIN_ROUND)
		
		# Draw the spark tail
		path = GeneralPath()
		path.moveTo(float(tailX), float(tailY))
		path.quadTo(
			float((tailX + sparkX) / 2.0 - sin(angle) * curlDirection * 5),
			float((tailY + sparkY) / 2.0 + drop * 0.15),
			float(sparkX),
			float(sparkY))			
		graphics.draw(path)
		
		# Paint a glowing spark at the head of the spark tail
		size = 3
		if spark % 12 == 0:
			size = 5
		graphics.color = system.gui.color(255, 245, 220, int(alpha * 0.9))
		graphics.fillOval(int(sparkX - size / 2), int(sparkY - size / 2), size, size)

		# Add in some snap, crakle, pop at the end of the explosion
		if sparkAgeFactor > 0.62 and spark % 4 == 0:
			crackleAlpha = int(alpha * (1.0 - sparkAgeFactor) * 1.8)
			graphics.color = system.gui.color(255, 255, 240, getClampedValue(crackleAlpha, 0, 255))
			graphics.fillOval(int(sparkX + ((spark % 3) - 1) * 4), int(sparkY - 2), 3, 3)

I'm calling it from the paintable canvas's repaint event handler with this script:

graphics = event.graphics
frame = event.source.frame

edgeOffset = 50
launchX = event.width / 2			# Center the launch point on the canvas
launchY = event.height + edgeOffset	# Put the launch point slightly below the canvas
for delay, burstX, burstY, rgb, particleCount, radius in animations.fireworksShow:
	animations.drawFireworksShow(
		graphics,
		frame,
		delay,
		launchX, launchY,		# launch point
		burstX, burstY,			# burst point
		rgb,
		particleCount,
		radius)

If anybody wants to paint the animated flag, simply reference the tutorial I made on flag animations here:
Paintable Canvas Hacks: Flag Animations